Sunday, March 01, 2009
NetBeans debugger does not stop on breakpoints
If NetBeans shows you that a debugger is running, however you can not stop it on breakpoint and the "Set In/Step Out /etc" menu is grayed out, it quite sure means that your debugger is not properly configured. Follow this post to configure your debugger to work with NetBeans properly.


Configuring Xdebug with XAMPP for NetBeans and Eclipse, Windows 7 and Win XP
UPDATE: Since XAMPP 1.7.2 + PHP 5.3 the things get much easier. Here is the quote from NetBeans web site, and it works! With this XAMPP version the only php.ini is located in \php
============ For old XAMP 1.7.0 ==================================
Installing NetBeans was easy. The more difficult part was configuring and making the PHP debugger work.
I have XAMPP installation on my Win XP and NetBeans uses Xdebug (http://www.xdebug.org), so I assumed it will be quite easy to configure all the stuff. Well, it was not that easy just because there is a missing link in NetBeans docs speaking about Xdebug config with XAMPP.
For XAMPP you should work with [xamp-dir]/php/php.ini. In fact there is another php.ini in/apache/bin - do not worry aboput it, it is just a shortcut to the first one.
First, make sure that anything in Zend section in your php.ini is commented out:
[Zend]
;zend_extension_ts = "C:\xampp\php\zendOptimizer\lib\ZendExtensionManager.dll"
;zend_extension_manager.optimizer_ts = "C:\xampp\php\zendOptimizer\lib\Optimizer"
;zend_optimizer.enable_loader = 0
;zend_optimizer.optimization_level=15
;zend_optimizer.license_path =
; Local Variables:
; tab-width: 4
; End:
Next, (IMPORTANT!) find the line
extension=php_xdebug.dll
and comment it out, so it becomes to be
;extension=php_xdebug.dll
That's seems strange and illogical, but trust me you must do it to get the things work. This is missed from most posts / threads RE Xdebug / Xampp, only few of them mention it.
Next, edit Xdebug section of your php.ini to look like:
XDebug]
;; Only Zend OR (!) XDebug
zend_extension_ts="C:\xampp\php\ext\php_xdebug.dll"
xdebug.remote_enable=1
xdebug.remote_host=127.0.0.1
xdebug.remote_portjavascript:void(0)=9000
xdebug.remote_mode=req
xdebug.remote_handler=dbgp
xdebug.profiler_enable=1
xdebug.profiler_output_dir="C:\xampp\tmp"
Now, restart Apache and point your browser to a PHP file with phpinfo().
You should see that xdebug appears twice in your phpinfo():
- once near the Zend Engine 2 logo, with text similar to
This program makes use of the Zend Scripting Language Engine:
Zend Engine v2.2.0, Copyright (c) 1998-2007 Zend Technologies
with Xdebug v2.0.4, Copyright (c) 2002-2008, by Derick Rethans
- and the second time much lower at that page, with the tables showing something like:
xdebug
xdebug support enabled
Version 2.0.4
Supported protocols Revision
DBGp - Common DeBuGger Protocol $Revision: 1.125.2.6 $
GDB - GNU Debugger protocol $Revision: 1.87 $
PHP3 - PHP 3 Debugger protocol $Revision: 1.22 $
If you do not see either of this appearances your configuration is incorrect!
Also, if you see the table with "Xdebug support" text, but there is a text saying "XDEBUG IS NOT INSTALLED AS ZEND EXTENSION" your configuration should be fixed.
Now, if you are done with that, go to Xdebug web and pick one of the latest Xdebug dlls. Put it in your [xampp-dir]/php/ext folder and change in php.ini the line
zend_extension_ts="C:\xampp\php\ext\php_xdebug.dll"
to point to the new dll, i.e.
zend_extension_ts="C:\xampp\php\ext\php_xdebug-2.0.4-5.2.8.dll"
"_ts" means thread safe, so you need a thread-safe dll version from Xdebug web.
Note that NOT all thread safe version found there will work with XAMPP. I am not sure why, but from the latest release only php_xdebug-2.0.4-5.2.8.dll works as it is expected, others e.g. php_xdebug-2.0.3-5.3.0.dll or php_xdebug-2.0.4-5.3.0-vc9.dll just does not worked for me, showing "XDEBUG IS NOT INSTALLED AS ZEND EXTENSION" or just disappearing from the phpinfo() at all.
Now save php.ini, restart Apache and verify that you see Xdebug info in two locations in phpinfo(), like it is explained above. If you got it working, both NetBeans and Eclipse PDT will be able to work with Xdebug now
Xdebug on XAMPP 1.7.2 (PHP 5.3)
- Locate and open XAMPP_HOME\php\php.ini for editing. This is the only php.ini file in XAMPP 1.7.2.
- Find and uncomment the line zend_extension = "XAMPP_HOME\php\ext\php_xdebug.dll".
- Find and uncomment the line xdebug.remote_host=localhost. Change the value of the setting from localhost to 127.0.0.1.
- Find and uncomment the line xdebug.remote_enable = 0. Change 0 to 1.
- Find and uncomment the line xdebug.remote_handler = "dbgp".
- Find and uncomment the line xdebug.remote_port = 9000.
- Save php.ini.
- Restart the Apache server.
============ For old XAMP 1.7.0 ==================================
Installing NetBeans was easy. The more difficult part was configuring and making the PHP debugger work.
I have XAMPP installation on my Win XP and NetBeans uses Xdebug (http://www.xdebug.org), so I assumed it will be quite easy to configure all the stuff. Well, it was not that easy just because there is a missing link in NetBeans docs speaking about Xdebug config with XAMPP.
For XAMPP you should work with [xamp-dir]/php/php.ini. In fact there is another php.ini in
First, make sure that anything in Zend section in your php.ini is commented out:
[Zend]
;zend_extension_ts = "C:\xampp\php\zendOptimizer\lib\ZendExtensionManager.dll"
;zend_extension_manager.optimizer_ts = "C:\xampp\php\zendOptimizer\lib\Optimizer"
;zend_optimizer.enable_loader = 0
;zend_optimizer.optimization_level=15
;zend_optimizer.license_path =
; Local Variables:
; tab-width: 4
; End:
Next, (IMPORTANT!) find the line
extension=php_xdebug.dll
and comment it out, so it becomes to be
;extension=php_xdebug.dll
That's seems strange and illogical, but trust me you must do it to get the things work. This is missed from most posts / threads RE Xdebug / Xampp, only few of them mention it.
Next, edit Xdebug section of your php.ini to look like:
XDebug]
;; Only Zend OR (!) XDebug
zend_extension_ts="C:\xampp\php\ext\php_xdebug.dll"
xdebug.remote_enable=1
xdebug.remote_host=127.0.0.1
xdebug.remote_portjavascript:void(0)=9000
xdebug.remote_mode=req
xdebug.remote_handler=dbgp
xdebug.profiler_enable=1
xdebug.profiler_output_dir="C:\xampp\tmp"
Now, restart Apache and point your browser to a PHP file with phpinfo().
You should see that xdebug appears twice in your phpinfo():
- once near the Zend Engine 2 logo, with text similar to
This program makes use of the Zend Scripting Language Engine:
Zend Engine v2.2.0, Copyright (c) 1998-2007 Zend Technologies
with Xdebug v2.0.4, Copyright (c) 2002-2008, by Derick Rethans
- and the second time much lower at that page, with the tables showing something like:
xdebug
xdebug support enabled
Version 2.0.4
Supported protocols Revision
DBGp - Common DeBuGger Protocol $Revision: 1.125.2.6 $
GDB - GNU Debugger protocol $Revision: 1.87 $
PHP3 - PHP 3 Debugger protocol $Revision: 1.22 $
If you do not see either of this appearances your configuration is incorrect!
Also, if you see the table with "Xdebug support" text, but there is a text saying "XDEBUG IS NOT INSTALLED AS ZEND EXTENSION" your configuration should be fixed.
Now, if you are done with that, go to Xdebug web and pick one of the latest Xdebug dlls. Put it in your [xampp-dir]/php/ext folder and change in php.ini the line
zend_extension_ts="C:\xampp\php\ext\php_xdebug.dll"
to point to the new dll, i.e.
zend_extension_ts="C:\xampp\php\ext\php_xdebug-2.0.4-5.2.8.dll"
"_ts" means thread safe, so you need a thread-safe dll version from Xdebug web.
Note that NOT all thread safe version found there will work with XAMPP. I am not sure why, but from the latest release only php_xdebug-2.0.4-5.2.8.dll works as it is expected, others e.g. php_xdebug-2.0.3-5.3.0.dll or php_xdebug-2.0.4-5.3.0-vc9.dll just does not worked for me, showing "XDEBUG IS NOT INSTALLED AS ZEND EXTENSION" or just disappearing from the phpinfo() at all.
Now save php.ini, restart Apache and verify that you see Xdebug info in two locations in phpinfo(), like it is explained above. If you got it working, both NetBeans and Eclipse PDT will be able to work with Xdebug now
Thursday, February 26, 2009
Adding new file extension to NetBeans 6.5
If all you need is just add a new file Extension and associate it with a certain type of the file (e.g. PHP or C++), go to Tools->Options->Miscellaneous->Files
and add a new extension there, then select the appropriate type.
It's took me sometime to find out where this simple thing is hidden in NetBeans.
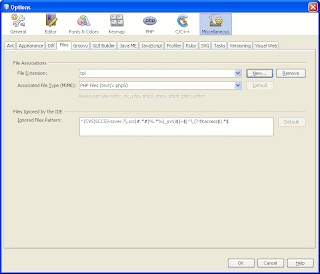
and add a new extension there, then select the appropriate type.
It's took me sometime to find out where this simple thing is hidden in NetBeans.

Sunday, February 22, 2009
Thunderbird and messages signatures
While working with Thunderbird, I have found a bug: whatever location you define for an identity signatures, they will be always located in the bottom of the replied / forwarded message.
Obviously, this is not convenient at all, but the solution is very simple: open Thunderbird menu
Tools --> Options --> Advanced Tab --> General, press "Config Editor..." button
In the long list which opens, find anything which starts from 'sig_bottom' (it will be one line per each identity you have defined) and double click these lines, thus replacing their values from 'false' to 'true'.
This solution was originally posted here and mentioned here
Obviously, this is not convenient at all, but the solution is very simple: open Thunderbird menu
Tools --> Options --> Advanced Tab --> General, press "Config Editor..." button
In the long list which opens, find anything which starts from 'sig_bottom' (it will be one line per each identity you have defined) and double click these lines, thus replacing their values from 'false' to 'true'.
This solution was originally posted here and mentioned here
Thunderbird and Google Calendar
It is perfectly possible to configure Thuderbird 2.x to work with Google Calendar.
I had to install 2 Mozilla Thunderbird extension: Google Calendar Provider and Lightning (both of them are required).
Then go to Calendar view and select "Calendar-> New Calendar..."
It opens a wizard. Select there "On the Network" option, then select "CalDav" (second option) at the next screen and when you see "Location" field, which is the most tricky part of this setup,
insert there https://www.google.com/calendar/dav//events
More details are here, but actually the described is enough to get your remote Google calendar working in the Thunderbird
What's cool: you do not have to install Mozilla Sunbird to get this work!
I had to install 2 Mozilla Thunderbird extension: Google Calendar Provider and Lightning (both of them are required).
Then go to Calendar view and select "Calendar-> New Calendar..."
It opens a wizard. Select there "On the Network" option, then select "CalDav" (second option) at the next screen and when you see "Location" field, which is the most tricky part of this setup,
insert there https://www.google.com/calendar/dav/
More details are here, but actually the described is enough to get your remote Google calendar working in the Thunderbird
What's cool: you do not have to install Mozilla Sunbird to get this work!
Monday, February 02, 2009
Adding a new user to mySQL DB with phpMyAdmin
In addition to the graphical UI provided by phpMyAdmin, you can just issue the following SQL:
GRANT ALL ON DB-NAME.* TO IDENTIFIED BY '';
replace by teh user name you want, e.g. fernandotorres and replace by the password for this user. Note that there are ' signs around the password - keep them.
http://www.trap17.com/index.php/adding-users-databases-using-phpmyadmin_t31803.html
GRANT ALL ON DB-NAME.* TO
replace
http://www.trap17.com/index.php/adding-users-databases-using-phpmyadmin_t31803.html
Apache with Virtual Hosts on Windows XP / XAMPP
I wanted my Apache / XAMPP to serve 3 different PHP projects / folders and my WinXP machine development machine.
I did following to allow that:
1. Add VirtualHosts - one for every root and add 'NameVirtualHost" directive. It is typically located in "extra\httpd-vhosts.confd" file. If you have your XAMPP in "C:\xampp", the path will be "C:\xampp\apache\conf\extra\httpd-vhosts.confd"
== httpd-vhosts.confd ===
NameVirtualHost 127.0.0.1
DocumentRoot "D:/xxx/yyy/zzz/prj1"
ServerName prj1
DocumentRoot "D:/xxx/yy/zzz/prj2"
ServerName prj2
DocumentRoot "D:/xxx/ttt/www/prj3"
ServerName prj3
2. Go to htppd.conf ( "C:\xampp\apache\conf\httpd.conf" in your XAMPP installation) and
verify that you hvae access permissions for every document root folder for prj1,2,3. Otherwwise
you end up with "Access Frobidden!" page.
=== httpd.conf ====
Options Indexes FollowSymLinks Includes ExecCGI
AllowOverride All
Order allow,deny
Allow from all
## The same "" definition should repeat for folder of prj2 and prj3
3. Go to Windows hosts file ("C\Windows\system32\drivers\etc\hosts" or similar) and add there new virtual hosts prj1,2,3, so you
can access them just by http://prj1 in your browser
=== hosts ===
127.0.0.1 prj1
127.0.0.1 prj2
127.0.0.1 prj3
4. Restart Apache and pint your browser to "prj1". You should be done now
I did following to allow that:
1. Add VirtualHosts - one for every root and add 'NameVirtualHost" directive. It is typically located in "extra\httpd-vhosts.confd" file. If you have your XAMPP in "C:\xampp", the path will be "C:\xampp\apache\conf\extra\httpd-vhosts.confd"
== httpd-vhosts.confd ===
NameVirtualHost 127.0.0.1
DocumentRoot "D:/xxx/yyy/zzz/prj1"
ServerName prj1
DocumentRoot "D:/xxx/yy/zzz/prj2"
ServerName prj2
DocumentRoot "D:/xxx/ttt/www/prj3"
ServerName prj3
2. Go to htppd.conf ( "C:\xampp\apache\conf\httpd.conf" in your XAMPP installation) and
verify that you hvae access permissions for every document root folder for prj1,2,3. Otherwwise
you end up with "Access Frobidden!" page.
=== httpd.conf ====
Options Indexes FollowSymLinks Includes ExecCGI
AllowOverride All
Order allow,deny
Allow from all
## The same "
3. Go to Windows hosts file ("C\Windows\system32\drivers\etc\hosts" or similar) and add there new virtual hosts prj1,2,3, so you
can access them just by http://prj1 in your browser
=== hosts ===
127.0.0.1 prj1
127.0.0.1 prj2
127.0.0.1 prj3
4. Restart Apache and pint your browser to "prj1". You should be done now
Subscribe to:
Posts (Atom)

 Posts
Posts

