Monday, September 23, 2024

Create 'myuser' Linux user to run your dedicated software

sudo apt update -y && sudo apt upgrade -y
sudo adduser myuser

Note the password you used for defining myuser user

(reference)

Give myuser 'sudo' permissions

sudo visudo

Add the below line right after the line with 'root' definitions

myuserALL=(ALL) NOPASSWD:ALL

Add 'myuser' as a tty user so it can run 'screen' with no issues:

sudo vi /etc/group

Modify

tty:x:5:

to look

tty:x:5:
myuser

Create folder for myuser software & logs

su - myuser
sudo mkdir /opt/myuser
sudo mkdir /opt/myuser/logs
su - myuser
sudo mkdir /opt/myuser/logs
sudo mkdir /opt/myuser &&

sudo chown -R myuser:myuser/opt/myuser

Allow user 'myuser' to remotly access the AMI via SSH

cd ~    
mkdir .ssh
chmod 700 .ssh
touch .ssh/authorized_keys
chmod 600 .ssh/authorized_keys
vi .ssh/authorized_keys

Export public key from a key-pair:

On Windows:

Open PuttyGen -> Conversions ->Import Key and import your ".pem" file. Right-click in the UI field labeled "Public key for pasting..." -> Select All ->Copy

On MAC/Linux use command:

ssh-keygen -y -f <.pem-file>

Note: the file should start from ssh-rsa and should end with imported-openssh-key

Paste content (public key) into vi editor, save and close the file.

Extend the user limit: add the below two lines

myuser    hard    nofile      500000
myuser    soft    nofile      500000

to sudo vi /etc/security/limits.conf

Check that you can SSH to the instance with your new user myuser.

Next, reboot and remove the original user - either 'ubuntu' or 'ec2-user'

sudo deluser ubuntu

Optional:

Add a cron job to clean up any our log file older than 14 days

crontab -e

if asked to select an editor for crontab select option '3' - vi.

Add to the crontab file

# Every 4 hours try removing any of our log files older than 14 days back
0 */4 * * * find /opt/myuser/logs -name '*.log.*' -mtime +2 -print -delete

save file and exit the editor.

Saturday, August 24, 2024

AWS EC2 EBS disks operations


Increase or replace an EBS disk

  1. Make a snapshot / backup copy

  2. Stop the service which uses this disk (e.g. sudo service mysql stop)

  3. Unmount the disk sudo umount /dev/xvdb

  4. Via AWS console, "detach Volume"

  5. Either "Modify Volume" adding some more space, or "Create" a new one with required size

  6. "Attach" volume back to the AMI via console

  7. Edit vi /etc/fstab to allow mount / permanent mount, adding a line like

/dev/nvme1n1  /home/adjesty/mnt auto defaults,noatime,nofail 0 2

7a. For a new volume, create the file system then mount & change the ownership / permissions from 'root'

sudo mkfs.ext4 /dev/xvdg

If there is a need to change the default amount of inodes** (Crawlers case when we create zillions of very small files) then use "-i <bytes-per-node>" flag as per reference

sudo mkfs.ext4 -i 1800 /dev/xvdg

the above will allocate 1800 bytes per an inode, so a 1GB disk will get 596,523 inodes (assuming each file is less than 1,800 bytes)

sudo mount /dev/xvdg
sudo chown -R mysql:mysql /db_tmp

7b. For the increased volume, mount & extend the file system

First, check that the device is in /etc/fstab, e.g.:

/dev/xvdg /db_data auto defaults,noatime,nofail 0 2

Next, mount it & then resize

sudo mount /dev/xvdg
sudo resize2fs /dev/xvdg

check with df -h that you have got the designed size:

Filesystem      Size  Used Avail Use% Mounted on
udev            216M     0  216M   0% /dev
tmpfs            46M  1.9M   44M   5% /run
/dev/nvme0n1p1  9.7G  7.6G  2.1G  79% /
tmpfs           230M     0  230M   0% /dev/shm
tmpfs           5.0M     0  5.0M   0% /run/lock
tmpfs           230M     0  230M   0% /sys/fs/cgroup
/dev/loop2       33M   33M     0 100% /snap/amazon-ssm-agent/2996
/dev/loop3       56M   56M     0 100% /snap/core18/2066
/dev/loop1       34M   34M     0 100% /snap/amazon-ssm-agent/3552
/dev/loop5       99M   99M     0 100% /snap/core/11081
/dev/loop6       56M   56M     0 100% /snap/core18/2074
/dev/loop4      100M  100M     0 100% /snap/core/11316
tmpfs            46M     0   46M   0% /run/user/1001
/dev/nvme1n1    492G   14G  458G   3% /home/adjesty/mnt

AWS instructions are here

For machines that already come with disks:

adjesty@ip-172-31-15-45:~$ lsblk
NAME        MAJ:MIN RM   SIZE RO TYPE MOUNTPOINT
loop0         7:0    0    89M  1 loop /snap/core/7713
loop1         7:1    0    18M  1 loop /snap/amazon-ssm-agent/1480
loop3         7:3    0    18M  1 loop /snap/amazon-ssm-agent/1455
loop4         7:4    0  89.1M  1 loop /snap/core/8039
nvme0n1     259:0    0 838.2G  0 disk /qt
nvme1n1     259:1    0    10G  0 disk 
└─nvme1n1p1 259:2    0    10G  0 part /
sudo mkfs.ext4 /dev/nvme0n1
sudo mkdir /ext
sudo mount /dev/nvme0n1 /ext

Tuesday, August 29, 2023

Solving Wordpress Critical Error on WP Admin's Login

If you get a "Critical Error" white screen when accessing your WP admin, look into the server's logs. Some hosting companies and software like CPanel make accessing logs quite an easy task.

My logs showed the following PHP error:

 [Tue Aug 29 11:53:45.667499 2023] [proxy_fcgi:error] [pid 592:tid 139914188318464] [client 1.2.3.4:0] AH01071: Got error 'PHP message: PHP Fatal error: Uncaught Error: Class "Elementor\\Core\\Schemes\\Color" not found in /home/user............quire_once('/home/user...')\n#6 /home/user/public_html/wp-admin/upgrade.php(18): require('/home/user...')\n#7 {main}\n thrown in /home/user...', referer: https://www.my.site/wp-admin/ 

The biggest challenge was to find what exactly is the path to the file which refers this "Elementor\\Core\\Schemes\\Color"  class. It appeared to be in /public_html/wp-content/mu-plugins/typography.php

I commented out all PHP content and tried to login again. This time there were no error and the WP offered me to complete the DB upgrade. Once the "Upgrade" button was pressed I instantly got the WP Dashboard back. The only thing that was left was to uncomment the code in /public_html/wp-content/mu-plugins/typography.php

Monday, June 05, 2023

Speeding up Ubuntu guest (23.04) on Windows 11 Home host with VirtualBox

I run VirtualBox v7.0.8 on an updated Windows 11 Home. 

Ubuntu 22.04 simply declined to work once installed on a VM. Even the "guest Additions" CD did not run automatically. Once Guest Addition ran manually, the VM still refused to open reasonably quickly. I tried installing 22.04 twice and then switched to the next in line.

Ubuntu 23.04 simply worked out of the box, but it had issues supporting a 4K monitor. Trying to enlarge the desktop to the full size of a 4K monitor caused blackouts. It was solved by adding more Display memory and increasing general VM RAM. 

Another glitch was that moving a window over a desktop left visual traces - copies of the same window that were living in the background forever. This issue was gone by switching "3D Acceleration" off.


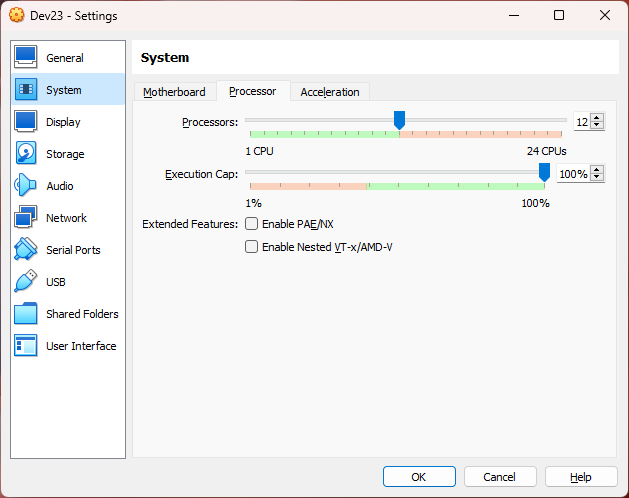
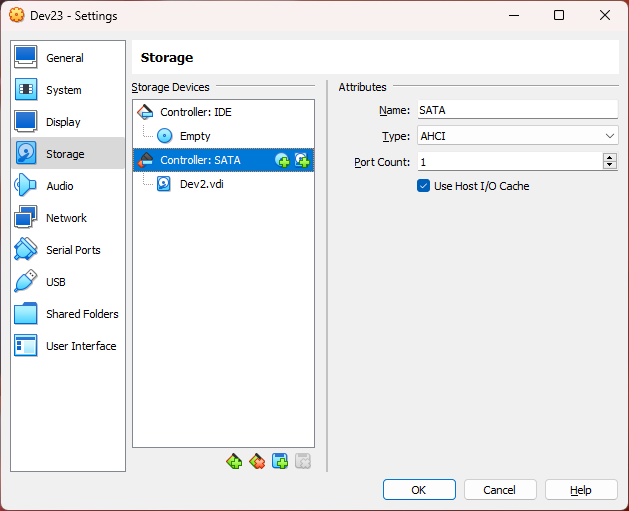
The VBox's VM settings look this way:


KVM Acceleration is selected for Linux guest


Display needs maximum RAM while "3D Acceleration" is better kept off


SATA Controller uses I/O Cache


And the disk is marked as SSD


And yet, switching off "Virtual Machine Platform" feature in Control Panel -> Programs and Features + Restart probably was one single game changer, speeding up the VM a few times.


Tuesday, September 27, 2022

AWS SAM fails on Windows 11 Home while trying to create an AWS Serverless project in PyCharm with AWS Toolkit

PyCharm shows an exception like this: 

java.lang.RuntimeException: Could not execute `sam init`!: [Cloning from https://github.com/aws/aws-sam-cli-app-templates (process may take a moment), Error: Unstable state when updating repo. Check that you have permissions to create/delete files in C:\Users\user\AppData\Roaming\AWS SAM directory or file an issue at https://github.com/aws/aws-sam-cli/issues] at software.aws.toolkits.jetbrains.services.lambda.wizard.SamInitRunner.execute$lambda-1(SamInitRunner.kt:55) 


This happens because the PATH variable on Windows 11 is limited to 260 chars (no idea why).

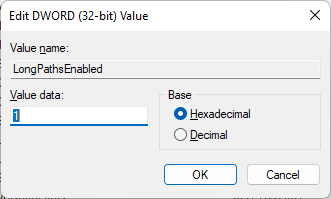
The fix is easy: Open Registry Editor (type "regedit" in Windows Search box)

and go to HKEY_LOCAL_MACHINE\SYSTEM\CurrentControlSet\Control\FileSystem


then change the value for "LongPathsEnabled" from 0 to 1.


You need a Docker on your computer to run a Local SAM build. Install it and run Docker Desktop at least once to accept T&C's and to start the docker service.

Unfortunately, the latest v4.12.0 Docker for Windows  (as of 2022-09-27) does not work well with the latest AWS SAM 1.57.0. 
AWS SAM "Local" build throughs an error. Downgrading to Docker 4.11.1 solves this issue as discussed here.

Python 3.9 is the latest version currently supported by AWS Lambda. Assuming this is what you have selected for your AWS Lambda project, you need to make sure that SAM can find in your path python 3.9 executable' folder. SAM refuses to continue if it knows the path to e.g. python 3.10 but not to python 3.9.

Monday, August 29, 2022

Runing Ubuntu with full GUI on Windows 10 WSL

 While I did not find the way to run a full-blown ubuntu-desktop I ended up with a nice lightweight LXDE Ubuntu GUI.


If Ubuntu app is not already installed on your computer download it from Microsoft Store.

Run the app and type in the terminal:

sudo apt update

sudo apt upgrade -y

sudo apt install lxde


Now you have to install X server for Windows to make it work. Install VcXsrv freeware.

Set DISPLAY and LIBGL_ALWAYS_INDIRECT values in your Ubuntu terminal. You can later add them both to ~/.bashrc to make this change permanent:

export DISPLAY="$(grep nameserver /etc/resolv.conf | sed 's/nameserver //'):0"

export LIBGL_ALWAYS_INDIRECT=1


DISPLAY=:0 is not enough! (here is some more info) Ubuntu app and Windows have different IP addresses so we have to specify the correct IP for the X-server.


Run X-server on Windows: VcSrv installs as XLaunch. Select "One Large Window" and "Display": 0.


Keep the default "No client"


IMPORTANT: Select "Disable access control" checkbox


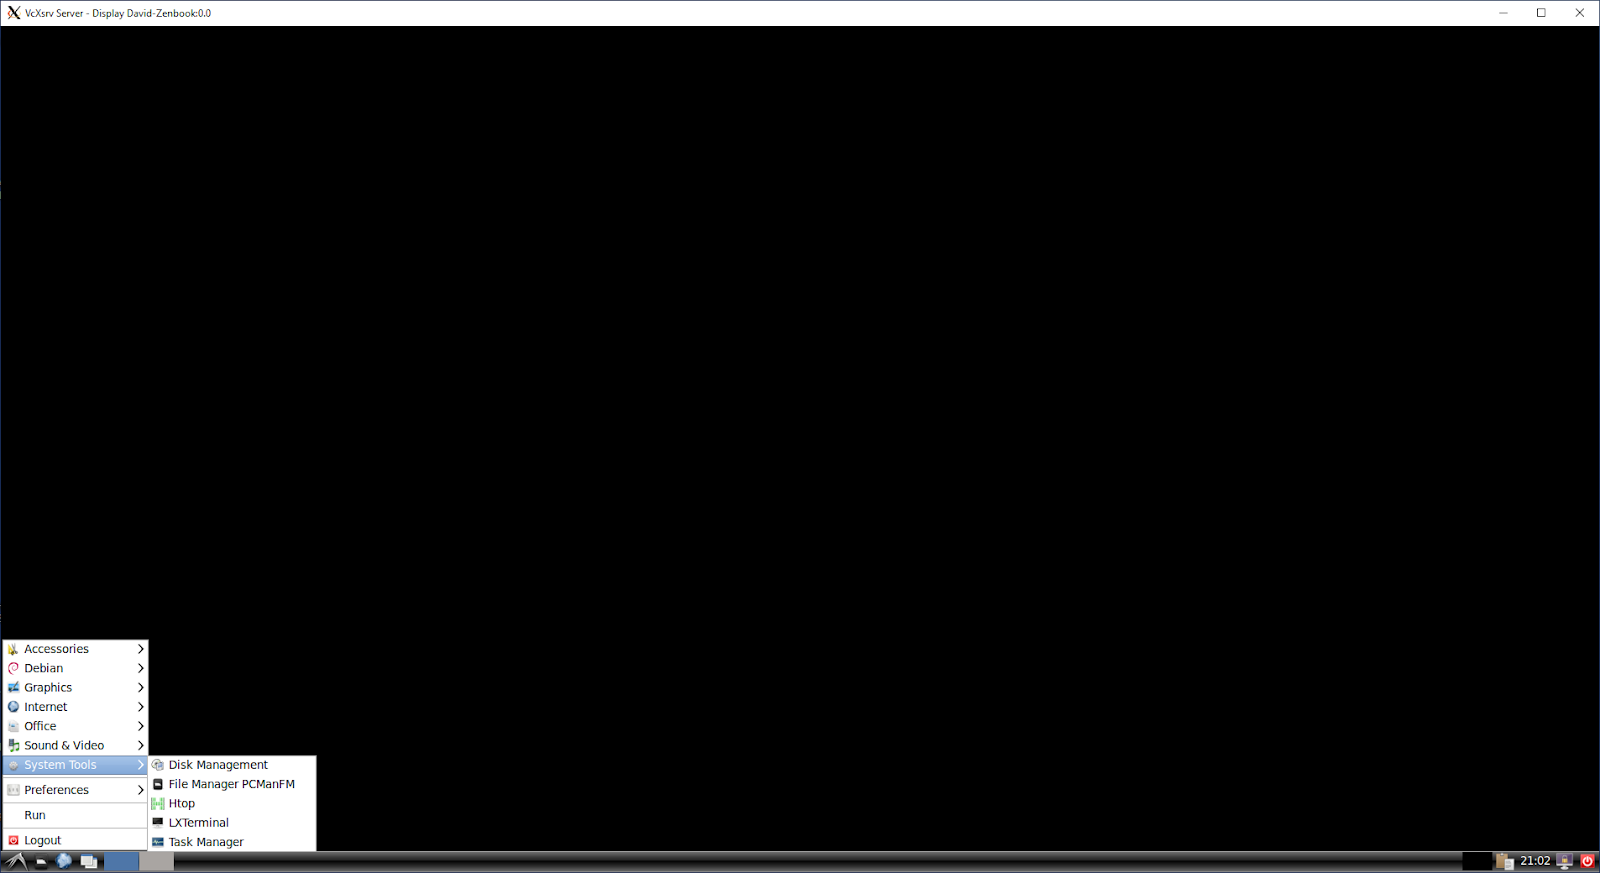
Click Next and then Finish buttons. You should get a blank window. Now in your Ubuntu terminal run:

startlxde &


You will get a "No session" dialog. It is fine, just hit "OK" button. And voila! - the full desktop appears


You can now run a terminal, Firefox, and install any Ubuntu app you want.


Thursday, June 03, 2021

Define Cloudflare DNS for a AWS S3 bucket

 It's quite a straightforward procedure if you know what to do.

1. Bucket name should exactly match your subdomain name, e.g. mycdn.mysite.com

2. Subdomains should be in one level. Buckets named like part1.mycdn.mysite.com won't work via DNS

3. Define a bucket policy granting Cloudflare servers access. See the JSON here, replace 'www.example.com' with your bucket name (mycdn.mysite.com)

4. Login to Cloudflare and in DNS section add a CNAME record:

mycdn.mysite.com => mycdn.mysite.com.s3.amazonaws.com


That's it!