Sunday, November 29, 2015

Setup a swap file for Linux / Ubuntu

Set up a swap file of 2GB in the "/" folder and attach swap to it

sudo fallocate -l 2G /swapfile
sudo chmod 600 /swapfile
sudo mkswap /swapfile
sudo swapon /swapfile

Test:

sudo swapon -s
free -m

Make your changes permanent:

sudo vi /etc/fstab

Add the following line:

/swapfile   none    swap    sw    0   0

save & close the file.

Twek swapinness (0-100). If near to 0 the kernel  will use swap only it is absolutely necessary.  Values near to 100 mean use more swap and use less RAM.
To see swappiness:
 
cat /proc/sys/vm/swappiness
 
and to change it
 
sudo vi /etc/sysctl.conf 
 
and add at the end of the file

vm.swappiness=10
 
(source) 

Saturday, November 21, 2015

s3cmd for Ubuntu

Installing s3cmd on Ubuntu is really easy:

sudo apt-get install s3cmd
 
and then

s3cmd --configure


Note the utility saves .s3cfg file in your home directory (if not requested differently), so for another user you will have to re-configure it or copy your ~/.s3cfg file and modify it, or run

s3cmd -c ...

Trying it out:

echo "test" ~/test.txt
s3cmd --mime-type='plain/text' put ~/test.txt s3://mybucket 

Explicitly specifying the MIME type avoids s3cmd to do any guesswork trying to determine the file' MIME type.


Friday, November 13, 2015

Qt: "undefined reference to vtable" while inheriting from QObject

Linker' error "undefined reference to vtable" in QT 5.5.1 (Linux-64 g++ 4.8) can be fixed by doing both these things:
a) rm - rf /*
(e.g. /build-myapp-Desktop_Qt_5_5_1_GCC_64bit)
b) moving the QObject definition in .h file next to public / private keyword, i.e. instead of

class Abc : public AnotherClass, QObject

make it

class Abc : public QObject, AnotherClass

Once done, rebuild the project.

Tuesday, November 03, 2015

Installing log4cxx and rdkafka libraries on Ubuntu 14.04 (@VirtualBox)

Installing log4cxx

sudo apt-get install autoconf automake
sudo apt-get install libxml2 libxml2-dev
sudo apt-get install libboost-dev
sudo apt-get install libcppunit-dev

sudo apt-get install libapr1 libaprutil1
sudo apt-get install liblog4cxx10 liblog4cxx10-dev 

If you want to check where it was installed:

sudo dpkg -L liblog4cxx10

For QtCreator add to your ".pro" project file the following:

LIBS += -lapr-1 -laprutil-1 -llog4cxx

(reference)

Installing csi-kafka from the source:

# pre-requisits
 
sudo apt-get install -y automake autogen shtool libtool git wget cmake unzip build-essential g++ python-dev autotools-dev libicu-dev zlib1g-dev openssl libssl-dev libcurl4-openssl-dev libbz2-dev libcurl3 libpq-dev
wget http://sourceforge.net/projects/boost/files/boost/1.59.0/boost_1_59_0.tar.gz/download -Oboost_1_59_0.tar.gz 
# installing boost librbaries
 
tar xvf boost_1_59_0.tar.gz
cd boost_1_59_0
sudo ./bootstrap.sh --prefix=/usr/local
./b2 -j 8 threading=multi
sudo ./b2 install --prefix=/usr/local
cd..
 
# add symbolic links to some boost libs so we'll find our libraries in the run time
  
sudo ln -sf /usr/local/lib/libboost_system.so.1.59.0 /lib/x86_64-linux-gnu/libboost_system.so.1.59.0
sudo ln -sf /usr/local/lib/libboost_thread.so.1.59.0 /lib/x86_64-linux-gnu/libboost_thread.so.1.59.0
sudo ln -sf /usr/local/lib/libboost_log.so.1.59.0 /lib/x86_64-linux-gnu/libboost_log.so.1.59.0
sudo ln -sf /usr/local/lib/libboost_filesystem.so.1.59.0 /lib/x86_64-linux-gnu/libboost_filesystem.so.1.59.0 
 
# installing csi-kafka librbaries
  
git clone https://github.com/bitbouncer/csi-build-scripts.git
git clone https://github.com/bitbouncer/csi-kafka.git  
 
cd csi-kafka
bash -e ./build_linux.sh
cd csi_kafka/
 
# copy lib & includes to a well-known location
  
sudo mkdir /usr/include/csi_kafka
sudo mkdir /usr/include/csi_kafka/internal
sudo cp *.h /usr/include/csi_kafka
sudo cp internal/*.h /usr/include/csi_kafka/internal/
cd ..
sudo cp lib/libcsi-kafka.a /usr/local/lib/
sudo ln -sf /usr/local/lib/libcsi-kafka.a /lib/x86_64-linux-gnu/libcsi-kafka.a

#for QtCreator, add:
 
QMAKE_CXXFLAGS += -std=c++11 -DBOOST_LOG_DYN_LINK

LIBS += -lboost_system -lboost_thread -lboost_log -lcsi-kafka
Running some samples require zookepercli utility

wget https://github.com/outbrain/zookeepercli/releases/download/v1.0.10/zookeepercli_1.0.10_amd64.deb 
sudo dpkg -i zookeepercli_1.0.10_amd64.deb

Installing librdkafka library from the source:

mkdir librdkafka
git clone https://github.com/edenhill/librdkafka.git librdkafka/
cd librdkafka/
./configure
make
sudo make install

On my system the intsall was into
/usr/local/lib/

ubuntuVM:~/librdkafka/examples$ ls -l /usr/local/lib/librdkafka*
-rwxr-xr-x 1 root root 1958676 Nov  5 08:34 /usr/local/lib/librdkafka.a
-rwxr-xr-x 1 root root  875272 Nov  5 08:34 /usr/local/lib/librdkafka++.a
lrwxrwxrwx 1 root root      15 Nov  5 08:34 /usr/local/lib/librdkafka.so -> librdkafka.so.1
lrwxrwxrwx 1 root root      17 Nov  5 08:34 /usr/local/lib/librdkafka++.so -> librdkafka++.so.1
-rwxr-xr-x 1 root root  943720 Nov  5 08:34 /usr/local/lib/librdkafka.so.1
-rwxr-xr-x 1 root root  354163 Nov  5 08:34 /usr/local/lib/librdkafka++.so.1


Create symbolic links so the shared RDKAFKA libraries could be found in run time when the application starts:
  
sudo ln -sf /usr/local/lib/librdkafka++.so.1 /lib/x86_64-linux-gnu/librdkafka++.so.1

sudo ln -sf /usr/local/lib/librdkafka.so.1 /lib/x86_64-linux-gnu/librdkafka.so.1

The correct order of the RDKAFKA libraries if you use C++ is as follow (note that rdkafka++ is prior to rdkafka):

-lz -lpthread -lrt -lrdkafka++ -lrdkafka

So the LIBS for QtCreator now looks this way


LIBS += -lapr-1 -laprutil-1 -llog4cxx \
        -lz -lpthread -lrt -lrdkafka++ -lrdkafka

Sunday, November 01, 2015

Installing Qt5.5.1 on Ubuntu 14.04 at VirtualBox

Step 1: Install pre-requisits

Instal pre-requisists following Building Qt From Git article:

sudo apt-get build-dep qt5-default

sudo apt-get install build-essential perl python git


sudo apt-get install "^libxcb.*" libx11-xcb-dev libglu1-mesa-dev libxrender-dev libxi-dev

sudo apt-get install flex bison gperf libicu-dev libxslt-dev ruby

sudo apt-get install libssl-dev libxcursor-dev libxcomposite-dev libxdamage-dev libxrandr-dev libfontconfig1-dev

sudo apt-get install libcap-dev libbz2-dev libgcrypt11-dev libpci-dev libnss3-dev build-essential libxcursor-dev libxcomposite-dev libxdamage-dev libxrandr-dev libdrm-dev libfontconfig1-dev libxtst-dev libasound2-dev gperf libcups2-dev libpulse-dev libudev-dev libssl-dev flex bison ruby

sudo apt-get install libasound2-dev libgstreamer0.10-dev libgstreamer-plugins-base0.10-dev

Step 2A: The easy way

Get the latest Qt binaries and run them, e.g.
wget http://qt.mirror.constant.com/archive/qt/5.5/5.5.1/qt-opensource-linux-x64-5.5.1.run
chmod 755 qt-opensource-linux-x64-5.5.1.run
sudo ./qt-opensource-linux-x64-5.5.1.run

Then go to step 4 and skip steps 2B-3B.

Step 2B: Get & Compile Qt from the Sources

The easy way described in Step 2A above is a much better way to go.

Go to the folder where Qt src file resides (e.g. ~/Downloads):

tar -xvf qt-everywhere-opensource-src-5.5.1.tar.gz
sudo mkdir /opt/qt5.5.1
cd qt-everywhere-opensource-src-5.5.1/

 ./configure -prefix /opt/qt5.5.1 -opensource -confirm-license -gstreamer

[it took nearly 6h to complete on my i7+SSD Dell Vostro with 12GB RAM given to Ubuntu VM]

Now we have to let the system know we are willing to use teh new Qt instead of the old default one:
Edit file (reference):

sudo vi /usr/lib/x86_64-linux-gnu/qt-default/qtchooser/default.conf

and make it look exactly like this:

/opt/qt5.5.1/bin
/opt/qt5.5.1/lib


(assuming Qt is installed in /opt/qt5.5.1 folder). Check what you got:


qtchooser -print-env

should now print

QT_SELECT="default"
QTTOOLDIR="/opt/qt5.5.1/bin"
QTLIBDIR="/opt/qt5.5.1/lib"

and

qmake -v

should say

QMake version 3.0
Using Qt version 5.5.1 in /opt/qt5.5.1/lib


Step 3B:  Get source & build QtCreator

Now let's build QtCreator from source: first, create a folder for the source code from git, e.g.


mkdir ~/Downloads/qtcreator
cd qtcreator
git clone --recursive git://code.qt.io/qt-creator/qt-creator.git 

Create a new folder for build (MUST be at the same level like qt-creator source code folder):


mkdir qtcreator-build
cd qtcreator-build/
qmake -r ../qt-creator/qtcreator.pro
make
sudo make install

Step 4: Get QtCreator work

On a run attempt QtCreator fails:

qtcreator
libGL error: pci id for fd 22: 80ee:beef, driver (null)
OpenGL Warning: glFlushVertexArrayRangeNV not found in mesa table
OpenGL Warning: glVertexArrayRangeNV not found in mesa table
OpenGL Warning: glCombinerInputNV not found in mesa table
OpenGL Warning: glCombinerOutputNV not found in mesa table
OpenGL Warning: glCombinerParameterfNV not found in mesa table
OpenGL Warning: glCombinerParameterfvNV not found in mesa table
OpenGL Warning: glCombinerParameteriNV not found in mesa table
OpenGL Warning: glCombinerParameterivNV not found in mesa table
OpenGL Warning: glFinalCombinerInputNV not found in mesa table
OpenGL Warning: glGetCombinerInputParameterfvNV not found in mesa table
OpenGL Warning: glGetCombinerInputParameterivNV not found in mesa table
OpenGL Warning: glGetCombinerOutputParameterfvNV not found in mesa table
OpenGL Warning: glGetCombinerOutputParameterivNV not found in mesa table
OpenGL Warning: glGetFinalCombinerInputParameterfvNV not found in mesa table
OpenGL Warning: glGetFinalCombinerInputParameterivNV not found in mesa table
OpenGL Warning: glDeleteFencesNV not found in mesa table
OpenGL Warning: glFinishFenceNV not found in mesa table
OpenGL Warning: glGenFencesNV not found in mesa table
OpenGL Warning: glGetFenceivNV not found in mesa table
OpenGL Warning: glIsFenceNV not found in mesa table
OpenGL Warning: glSetFenceNV not found in mesa table
OpenGL Warning: glTestFenceNV not found in mesa table
libGL error: core dri or dri2 extension not found
libGL error: failed to load driver: vboxvideo
OpenGL Warning: XGetVisualInfo returned 0 visuals for 00000000029efa10
OpenGL Warning: Retry with 0x8002 returned 0 visuals
OpenGL Warning: XGetVisualInfo returned 0 visuals for 00000000029efa10
OpenGL Warning: Retry with 0x8002 returned 0 visuals
OpenGL Warning: glXGetFBConfigAttrib for 00000000029efa10, failed to get XVisualInfo
OpenGL Warning: XGetVisualInfo returned 0 visuals for 00000000029efa10
OpenGL Warning: Retry with 0x8002 returned 0 visuals
OpenGL Warning: glXGetFBConfigAttrib for 00000000029efa10, failed to get XVisualInfo
OpenGL Warning: XGetVisualInfo returned 0 visuals for 00000000029efa10
OpenGL Warning: Retry with 0x8002 returned 0 visuals
OpenGL Warning: glXGetFBConfigAttrib for 00000000029efa10, failed to get XVisualInfo
OpenGL Warning: XGetVisualInfo returned 0 visuals for 00000000029efa10
OpenGL Warning: Retry with 0x8002 returned 0 visuals
OpenGL Warning: glXGetFBConfigAttrib for 00000000029efa10, failed to get XVisualInfo
OpenGL Warning: XGetVisualInfo returned 0 visuals for 00000000029efa10
OpenGL Warning: Retry with 0x8002 returned 0 visuals
OpenGL Warning: glXGetFBConfigAttrib for 00000000029efa10, failed to get XVisualInfo
OpenGL Warning: XGetVisualInfo returned 0 visuals for 00000000029efa10
OpenGL Warning: Retry with 0x8002 returned 0 visuals
OpenGL Warning: glXGetFBConfigAttrib for 00000000029efa10, failed to get XVisualInfo
OpenGL Warning: XGetVisualInfo returned 0 visuals for 00000000029efa10
OpenGL Warning: Retry with 0x8002 returned 0 visuals
OpenGL Warning: glXGetFBConfigAttrib for 00000000029efa10, failed to get XVisualInfo
OpenGL Warning: XGetVisualInfo returned 0 visuals for 00000000029efa10
OpenGL Warning: Retry with 0x8002 returned 0 visuals
OpenGL Warning: glXGetFBConfigAttrib for 00000000029efa10, failed to get XVisualInfo
OpenGL Warning: XGetVisualInfo returned 0 visuals for 00000000029efa10
OpenGL Warning: Retry with 0x8002 returned 0 visuals
Could not initialize GLX
Aborted (core dumped)


The only solution I found was shutting down  my VirtualBox VM, go to Settings->Display and switch OFF 3-D acceleration like suggsted here.

I still got some run-time errors:

libGL error: pci id for fd 22: 80ee:beef, driver (null)
libGL error: core dri or dri2 extension not found
libGL error: failed to load driver: vboxvideo


but now QtCreator window opened.


Friday, October 16, 2015

ffmpeg for Ubuntu

I looked for ffmpeg to run on my Ubuntu VirtualBox VM. However, it turned out that there is a competitor (fork of ffmpeg) which is typically used with Ubuntu: libav.

So the install was very easy:

sudo apt-get update
sudo apt-get install libav-tools

and avprobe prints info about the video file -

avprobe https://gcdn.2mdn.net/videoplayback/id/7ebb83bb9297af8d/itag/18/source/doubleclick_dmm/ratebypass/yes/ip/0.0.0.0/ipbits/0/expire/3587029237/sparams/id,itag,source,ratebypass,ip,ipbits,expire/signature/36DDC1C4CFC5ABA238B4083DAA7201572D462CA4.A5F92B30B2160257A3D5EE0D8E87D35048111DAB/key/ck2/file/file.mp4

avprobe version 9.18-6:9.18-0ubuntu0.14.04.1, Copyright (c) 2007-2014 the Libav developers
  built on Mar 16 2015 13:19:10 with gcc 4.8 (Ubuntu 4.8.2-19ubuntu1)
Input #0, mov,mp4,m4a,3gp,3g2,mj2, from 'https://gcdn.2mdn.net/videoplayback/id/7ebb83bb9297af8d/itag/18/source/doubleclick_dmm/ratebypass/yes/ip/0.0.0.0/ipbits/0/expire/3587029237/sparams/id,itag,source,ratebypass,ip,ipbits,expire/signature/36DDC1C4CFC5ABA238B4083DAA7201572D462CA4.A5F92B30B2160257A3D5EE0D8E87D35048111DAB/key/ck2/file/file.mp4':
  Metadata:
    major_brand     : mp42
    minor_version   : 0
    compatible_brands: isommp42
    creation_time   : 2015-09-18 13:00:31
  Duration: 00:00:15.00, start: 0.000000, bitrate: 489 kb/s
    Stream #0.0(und): Video: h264 (Constrained Baseline), yuv420p, 640x360 [PAR 1:1 DAR 16:9], 389 kb/s, 25 fps, 25 tbr, 25 tbn, 50 tbc
    Stream #0.1(eng): Audio: aac, 44100 Hz, stereo, fltp, 96 kb/s
    Metadata:
      creation_time   : 2015-09-18 13:00:31
# avprobe output

Monday, October 12, 2015

Beginning Apache Kafka with VirtualBox Ubuntu server & Windows Java Kafka client

After reading a few articles like this one demonstarting significant performance advantages of Kafa message brokers vs older RabbitMQ and AtciveMQ solutions I decided to give Kafka a try with the new project I am currently playing with.

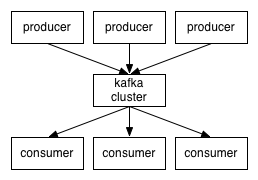
The documentation shows quite a simple initial picture, which quite the same for all the messaging systems:
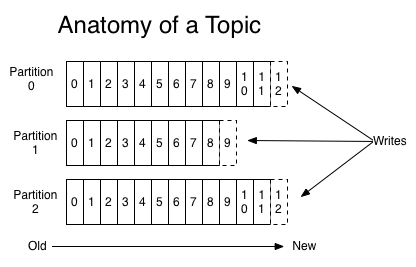
The things getting more interesting with partitioned topics
where Producers have to select to which partition they write at each time.

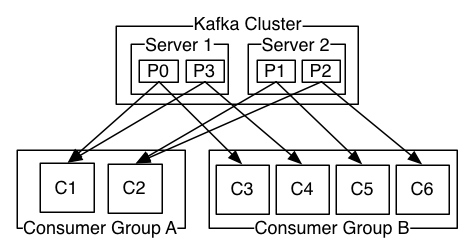
Kafka adds new Consumer Group concept.
Consumers in the same group are granted to work in queuing mode, i.e. the message delivered to consumer A in this group won't be delivered to consumer B in the same group. The same message is "broadcasted" to different consumers groups.
And this quote came to me quite surprising:
Kafka is able to provide both ordering guarantees and load balancing over a pool of consumer processes. This is achieved by assigning the partitions in the topic to the consumers in the consumer group so that each partition is consumed by exactly one consumer in the group. By doing this we ensure that the consumer is the only reader of that partition and consumes the data in order. Since there are many partitions this still balances the load over many consumer instances. Note however that there cannot be more consumer instances than partitions.

One partition = one consumer, # partitions >= # consumers.
And this is because the order of messages is granted within a partition, but not at the topic level. So actually a partition is kind of a "unique single consumer [sub]topic".

Knowning  that Kafka was initially developed at LinkedIn it is actually not that surprising -

The original use case for Kafka was to be able to rebuild a user activity tracking pipeline as a set of real-time publish-subscribe feeds. This means site activity (page views, searches, or other actions users may take) is published to central topics with one topic per activity type.

Kafka FAQ says on that:
How do I choose the number of partitions for a topic?
There isn't really a right answer, we expose this as an option because it is a tradeoff. The simple answer is that the partition count determines the maximum consumer parallelism and so you should set a partition count based on the maximum consumer parallelism you would expect to need (i.e. over-provision). Clusters with up to 10k total partitions are quite workable. Beyond that we don't aggressively test (it should work, but we can't guarantee it).
Here is a more complete list of tradeoffs to consider:
  • A partition is basically a directory of log files.
  • Each partition must fit entirely on one machine. So if you have only one partition in your topic you cannot scale your write rate or retention beyond the capability of a single machine. If you have 1000 partitions you could potentially use 1000 machines.
  • Each partition is totally ordered. If you want a total order over all writes you probably want to have just one partition.
  • Each partition is not consumed by more than one consumer thread/process in each consumer group. This allows to have each process consume in a single threaded fashion to guarantee ordering to the consumer within the partition (if we split up a partition of ordered messages and handed them out to multiple consumers even though the messages were stored in order they would be processed out of order at times).
  • Many partitions can be consumed by a single process, though. So you can have 1000 partitions all consumed by a single process.
  • Another way to say the above is that the partition count is a bound on the maximum consumer parallelism.
  • More partitions will mean more files and hence can lead to smaller writes if you don't have enough memory to properly buffer the writes and coalesce them into larger writes
  • Each partition corresponds to several znodes in zookeeper. Zookeeper keeps everything in memory so this can eventually get out of hand.
  • More partitions means longer leader fail-over time. Each partition can be handled quickly (milliseconds) but with thousands of partitions this can add up.
  • When we checkpoint the consumer position we store one offset per partition so the more partitions the more expensive the position checkpoint is.
  • It is possible to later expand the number of partitions BUT when we do so we do not attempt to reorganize the data in the topic. So if you are depending on key-based semantic partitioning in your processing you will have to manually copy data from the old low partition topic to a new higher partition topic if you later need to expand.
Kafka invests a great deal of energy in keeping the messages ordered exactly like they were sent out by producers. It looks like if your system is not sensitive to the exact order of the messages (e.g. handles some events, and it does not care too much about which event came before because they anyway got their own timestamps) Kafka could introduce unnecessary complexity compared to traditional message brokers. From the other hand, Kafa excels in managing high TPS volumes, so if you plan to run more than e.g. 5K msg/sec you probably have no choice but stick to Kafka.

In addition to messaging, Kafka (like any other broker of course) can be used for centralized logs collection. The idea is that an application sends its log lines to Kafka instead of writing it on the disk.
There is log4j for Kafka connector which easily allows that (note this config Q&A). This architectural pattern works particularly well when you deal with cloud-based systems, and especially if you work with AWS spot instances that can die before you got a chance to access any local log file.

Latest stable Kafka release at the time of writing is 0.8.2.2. I am going to install it on my VirtualBox Ubuntu 14.04 LTS VM and run a single broker to try Consumer and Producer code with it.
Default Kafka server listens on port 2181. Let's add Port Forwarding  to my VM as described here (we'll need to shutdown the machine prior to changing VirtualBox VM Settings).

Very important: Update your hosts file (C:\Windows\System32\drivers\etc\hosts) with the line like this:
127.0.0.1    ubuntuVM
where ubuntuVM stands for the name of your VirtualBox machine' hostname. If you won't do it your Windows Kafka clients will not be unable to resolve "ubuntuVM" name coming back from Kafka server on your VirtualBox. Without log4j switched on it looks like the call to synchromous calls to Producers and Consumers block. Wityh log4j you see that they actually run in the endless loop of exceptions / failures.

When the VM is restarted let's create a dedicated user for Kafka broker:

sudo useradd kafka -m
sudo passwd kafka

And now add it to sudoers

sudo adduser kafka sudo
su - kafka

Go to the Mirrors page and select the binary, then run wget, e.g.:

wget http://apache.mivzakim.net/kafka/0.8.2.2/kafka_2.11-0.8.2.2.tgz
tar -xvf kafka_2.11-0.8.2.2.tgz
cd kafka_2.11-0.8.2.2

I want to make a few changes to the default Kafka broker configuration in
/config/server.properties
First, I want to set
num.partitions=512
(instead of the default 1), so I will be able to run up to 512 consumers simulatenously .
Next, I am looking to manipulate topics programmatically, so I am adding
delete.topic.enable=true
to the "Server Basics" section (like suggested here).
Save the file

If you do not have Java installed yet you can follow this post to manually install Oracle JDK. Otherwise, we are good to continue. Start ZooKeeper instance via supplied script:


bin/zookeeper-server-start.sh config/zookeeper.properties

and start Kafka broker in another terminal window

bin/kafka-server-start.sh config/server.properties

To make sure we got everything working let's open MS "cmd.exe" and type there

telnet localhost 2181

we should be now connected to our Kafka broker. Disconnect / close "cmd.exe".

Next, let's open yet another (3-rd) terminal window and make sure we can create a topic and listen to it with a consumer, provided "in the box":

bin/kafka-topics.sh --create --zookeeper localhost:2181 --replication-factor 1 --partitions 1 --topic test


bin/kafka-console-consumer.sh --zookeeper localhost:2181 --topic test --from-beginning

Now it is the time to start developing some Java code to try our own Producer. Note that since version 0.8.2 Kafka introduces new clients API, and the new KafkaProducer class is the first step to better clients.
Maven dependency for pom.xml is as follow:
 
<dependency>
    <groupId>org.apache.kafka</groupId>
    <artifactId>kafka-clients</artifactId>
    <version>0.8.2.2</version>
</dependency>

It is important to properly initialize log4j so if Kafka client library throws some errors you at least can see them.
You can add
-Dlog4.configuration=file:/...
option to your run time


(IntelliJ sample where to add log4j config file name in IDE)

and the config file can look e.g. this way:

log4j.rootLogger=debug, stdout, R
log4j.appender.stdout=org.apache.log4j.ConsoleAppenderlog4j.appender.stdout.layout=org.apache.log4j.PatternLayout
# Pattern to output the caller's file name and line number.log4j.appender.stdout.layout.ConversionPattern=%5p [%t] (%F:%L) - %m%n
log4j.appender.R=org.apache.log4j.RollingFileAppenderlog4j.appender.R.File=example.log
log4j.appender.R.MaxFileSize=100KB# Keep one backup filelog4j.appender.R.MaxBackupIndex=1
log4j.appender.R.layout=org.apache.log4j.PatternLayoutlog4j.appender.R.layout.ConversionPattern=%p %t %c - %m%n


This simple Producer test should now work:

import java.util.Properties;
import java.util.concurrent.ExecutionException;

import org.apache.kafka.clients.producer.KafkaProducer;
import org.apache.kafka.clients.producer.ProducerConfig;
import org.apache.kafka.clients.producer.ProducerRecord;
import org.apache.kafka.common.serialization.StringSerializer;

/** * An example using the new java client Producer for Kafka 0.8.2 * * 2015/02/27 * @author Cameron Gregory, http://www.bloke.com/ */public class KafkaTest {
    public static void main(String args[]) throws InterruptedException, ExecutionException {
        Properties props = new Properties();
        props.put(ProducerConfig.BOOTSTRAP_SERVERS_CONFIG,"localhost:9092");
        props.put(ProducerConfig.VALUE_SERIALIZER_CLASS_CONFIG,StringSerializer.class.getName());
        props.put(ProducerConfig.KEY_SERIALIZER_CLASS_CONFIG,StringSerializer.class.getName());

        KafkaProducer producer = new KafkaProducer(props);

        boolean sync = true;
        String topic="test";
        String key = "mykey";
        String value = "myvalue";
        ProducerRecord producerRecord = new ProducerRecord(topic, 0, key, value);
        if (sync) {
            producer.send(producerRecord).get();
        } else {
            producer.send(producerRecord);
        }
        producer.close();
    }
}
 
If all the setting are fine we will see
myvalue
message in our consumer running in the VirtualBox. Our Windows-based Kafka Producer sent a message to VirtualBox-installed Kafka server and VirtualBox-installed Consumer got it! Now we can go wild and develop better Producer and Consumers on Windows vs. VirtualBox Kafka server.

However, the real deal is writing a good Consumer.  And this is because Kafka very much differes from e.g. RabbitMQ. A RabbitMQ consumer which just connects to a topic will get the first message, than the next one and so on. Two connected RabbitMQ consumers will get messags in the round-robin manner.

Kafka consumers are different. First, there are two types of consumers: "high-level" and "simple". Next, the High Level consumer, which is the simpliest Kafka consumer implemenattion is not set to get "old" messages that were published to the topic prior its run.

So if you want to follow RabbitMQ consumers behavior, i.e. start reading messages that were published on the topic everytime the consumer starts you have no choice but looking into the "simple consumer".

Kafka is written in Scala and I found ConsoleConsumer which is provided as a part of Kafka packages and behaves exactly like I wanted, reading the topic from the beginning. I added Scala 2.11.7 to my ItelliJ project (right-click on project, "Add Framework Suport...", then do teh same on the module where you want Scala), created a new Scala script file and copied the code there to see how it runs. Oops...

Error:scalac: Error: object VolatileByteRef does not have a member create
scala.reflect.internal.FatalError: object VolatileByteRef does not have a member create
    at scala.reflect.internal.Definitions$DefinitionsClass.scala$reflect$internal$Definitions$DefinitionsClass$$fatalMissingSymbol(Definitions.scala:1186)
    at scala.reflect.internal.Definitions$DefinitionsClass.getMember(Definitions.scala:1203)
    at scala.reflect.internal.Definitions$DefinitionsClass.getMemberMethod(Definitions.scala:1238)
    at scala.tools.nsc.transform.LambdaLift$$anonfun$scala$tools$nsc$transform$LambdaLift$$refCreateMethod$1.apply(LambdaLift.scala:41)
  [...]
    at sbt.compiler.AnalyzingCompiler.compile(AnalyzingCompiler.scala:41)
    at org.jetbrains.jps.incremental.scala.local.IdeaIncrementalCompiler.compile(IdeaIncrementalCompiler.scala:29)
    at org.jetbrains.jps.incremental.scala.local.LocalServer.compile(LocalServer.scala:26)
    at org.jetbrains.jps.incremental.scala.remote.Main$.make(Main.scala:62)
    at org.jetbrains.jps.incremental.scala.remote.Main$.nailMain(Main.scala:20)
    at org.jetbrains.jps.incremental.scala.remote.Main.nailMain(Main.scala)
    at sun.reflect.NativeMethodAccessorImpl.invoke0(Native Method)
    at sun.reflect.NativeMethodAccessorImpl.invoke(NativeMethodAccessorImpl.java:62)
    at sun.reflect.DelegatingMethodAccessorImpl.invoke(DelegatingMethodAccessorImpl.java:43)
    at java.lang.reflect.Method.invoke(Method.java:497)
    at com.martiansoftware.nailgun.NGSession.run(NGSession.java:319)


Further more, even this HelloWorld sample

object HelloWorld {
  def main(args: Array[String]) {
    println("Hello, world!")
  }
}
 
compiles, but fails to run with a similar error. It took me sometime to recognize that my Kafka libraries are compiled with Scala 2.10 while I run IntelliJ with Scala 2.11.7 - and this what actually caused the trouble! Once I changed my Maven dependencies from Kafka_2.10 to Kafka_2.11

<dependency>
    <groupId>org.apache.kafka</groupId>
    <artifactId>kafka_2.11</artifactId>
    <version>0.8.2.2</version>
</dependency>


the HelloWorld sample started to run showing the expected output:

Hello, world!
Process finished with exit code 0


and I was able to run the ConsoleConsumer as well.

Another finding is that Kafka_2.10 Consumer can not get early messages from Kafka_2.11 server, even when this is the same 0.8.2.2 Kafka version. Something goes wrong with

ZkUtils.maybeDeletePath(a_zookeeper, "/consumers/" + a_groupId);


when 2.10-0.8.2.2 Consumer attempts to read historical messages from 2.11-0.8.2.2 server.
Also, it is mandatory to specify
 
props.put("auto.offset.reset", "smallest");
 
in order to get already stored messages from the beginning of the queue. Two above lines do all the magic, allowing the Consumer to read the previous messages. Here is a sample Java code for the High Level Kafka Consumer which reads all historical messages, just like ConsoleConsumer.scala does (works):

import kafka.consumer.ConsumerConfig;
import kafka.consumer.ConsumerIterator;
import kafka.consumer.KafkaStream;
import kafka.javaapi.consumer.ConsumerConnector;
import kafka.utils.ZkUtils;

import java.util.HashMap;
import java.util.List;
import java.util.Map;
import java.util.Properties;

public class KafkaBasicConsumerTest {

    public KafkaBasicConsumerTest() {
    }

    public void run( String a_zookeeper, String a_groupId, String a_topic){
        Properties props = new Properties();
        props.put("zookeeper.connect", a_zookeeper);
        props.put("group.id", a_groupId);
        props.put("auto.offset.reset", "smallest"); // start reading from the beginning
        props.put("zookeeper.session.timeout.ms", "4000");
        props.put("zookeeper.sync.time.ms", "2000");
        props.put("auto.commit.interval.ms", "500");
        ConsumerConfig consumerConfig = new ConsumerConfig(props);

        ConsumerConnector consumer = kafka.consumer.Consumer.createJavaConsumerConnector( consumerConfig);
        ZkUtils.maybeDeletePath(a_zookeeper, "/consumers/" + a_groupId);

        Map topicCountMap = new HashMap();
        topicCountMap.put(a_topic, 1);
        Map>> consumerMap = consumer.createMessageStreams(topicCountMap);
        List> streams = consumerMap.get(a_topic);
        KafkaStream stream = streams.get(0);

        ConsumerIterator it = stream.iterator();
        while(it.hasNext())
            System.out.println( "Received Message: " + new String(it.next().message()));
    }


    public static void main(String[] args) {
        KafkaBasicConsumerTest consumer = new KafkaBasicConsumerTest();
        consumer.run( "127.0.0.1:2181", "test-group",  "test");
    }
}

Of course there is no errors handling, no proper shutdown and no multithreading. It all should be added to a HL Kafka Consumer once you move on.

It is important to understand the following:
Kafka requires the Consumers to manage what they already read  / consume and what they did not. Zookeper helps in storing the last read offset for each Consumers Group (i.e. for HL Consumers). If the Consumer [Group] never accessed a topic it got no previous offset there and, unless a special magic happens, can not see the messages the Producers sent there. However, if a certain Consumer [Group / HL Consumer] has accessed the topic at least once Zookeper saves its offset and the Consumer will be feeded with all the messages the Producers sent when the Consumer[Group] was offline at the next time the Consumer[Group] connects to the topic.

Saturday, October 10, 2015

VirtualBox Ubuntu xterm Guest <-> Host copy & paste

When copying and pasting between guest VB Ubuntu huest and my host Windows machine Xterm does not work well (other applications have no problem).
Instead, I choose Gnome terminal (/usr/bin/gnome-terminal), which I like more due to smooth Copy&Paste, clear deafult colors scheme and better integration with Ubuntu desktop ("New terminal" menu on docked icon instead of "mid-click" - go figure that out - way of opening a new window with Xterm).

Manually install Oracle Java SDK on Ubuntu

The tar.gz provided by Oracle don't have an actual installation process. You just extract those files to a location you want and add them to your path. So the process is the following:
  • Make a folder for your Java installs, e.g.
    sudo mkdir /usr/local/java/
  • Download & extarct there a .tar.gz from Oracle (here I will be using jdk-8u60-linux-x64.tar.gz);
  • Create a file /etc/profile.d/oraclejdk.sh with the following content (adapt the paths to reflect the path where you stored your JDK):
    export J2SDKDIR=/usr/local/java/jdk1.8.0_60/
    export J2REDIR=/usr/local/java/jdk1.8.0_60/jre
    export PATH=$PATH:/usr/local/java/jdk1.8.0_60/bin:/usr/local/java/jdk1.8.0_60/db/bin:/usr/local/java/jdk1.8.0_60/jre/bin
    export JAVA_HOME=/usr/local/java/jdk1.8.0_60
    export DERBY_HOME=/usr/local/java/jdk1.8.0_60/db
Done! Those paths will only be recognized after you logout or restart, so if you want to use them right away run source /etc/profile.d/oraclejdk.sh.

(slightly modified source)

Sunday, October 04, 2015

Trying AKKA, Java, Scala, IntelliJ, Aerospike, Maven & Git with BitBucket on Windows

Discalimer: it is not a clean "how-to guide" for any of teh above tools or technologies. It's more like a record of my backs and forwards exploring this route, a list of thoughts, foundings and decisions I made while trying to make the things work for me.

I wanted to try some AKKA / Scala code which is new for me, and thought of creating a sample code which puts smth to / gets something from Aerospike DB. My primary machine is Windows 8.1 and I run VirtualBox with a varity of Linux distributions.

Reading the docs I understood that installing Aerospike on Windows actually does not make sense since there is no native Windows code for Aerospike. Intsead, the DB comes with Vagrant VM and it should run inside VirtualBox anyway, so I simply installed Aerospike on aVirtualBox Ubuntu VM following these simple steps: http://www.aerospike.com/docs/operations/install/linux/ubuntu/.

It worked like a charm from the first try, so I went to the next step: AKKA/Scala/Java and IntelliJ. I installed the latest IntelliJ Community (v15 Preview) https://www.jetbrains.com/idea/download/
and Typesafe Activator at http://akka.io/downloads/.

Activator is a web server packed with documentation, explanations and samples, and it can generate ready-to-use Eclipse and IntelliJ projects for each sample, providing both Java and Scala code in every project. When you start the process via suplied "./activator.bat" file it opens a new browser tab showing the list of samples and other content. Quite sure inside it is build with Typesafe' Play framework. I found it a pretty nice thing to start with.

So I went to "Hello Akka" sample in my browser and generated an IntelliJ project, which I opened in the brand new IntelliJ. I wanted the project to be managed by Maven, so I needed to add the Aerospike dependencies to "pom.xml" Maven file. But there was no "pom.xml" in the IntelliJ project generated by Typesafe Activator. Right-click on the "hello-akka" project name -> "Add Framework Support" -> selecting "Maven" added "pom.xml" to my new project (source), so I could add there the dependency code


<dependencies>
  <dependency>
    <groupId>com.aerospike</groupId>
    <artifactId>aerospike-client</artifactId>
    <version>3.1.5</version>
  </dependency>
</dependencies>

as per the Aerospike documentation. Aerospike currently does not have a Scala client library, so the initial plan of Scala tests did not work - I have to write the client code in Java.

If you do not have a working stand-alone Maven on your computer download and install it, so you can build Aerospike examples either with "mvn package" or with the provided "./build_all" script (seems the both commands do exactly the same) right from the command line. You will also need a working Git install for your Windows computer.

Default Maven settings location on Windows 8+ is "C:\Users\\.m2". The remote repositories are specified in "settings.xml" file (details). Your $MAVEN_HOME/conf folder contains a default "settings.xml" file which you can copy in your "Users" folder if something went wrong in the user' copy.

In order to work with a remote Git repository such as GitHub or Bitbucket you will need SSH access to them, otherwise you will be prompted for a password on each Git push. You should have a SSH key for that. This manual explains how to generate / find your SSH keys for GitHub, this one is the similar explanation for BitBucket.
If you do not have a key or if you need yet another SSH key (multiple Bitbuckets accounts require multiple SSH keys, one per each account) you can run this command in Git Bash to generate the new key:

ssh-keygen -t rsa -f ~/.ssh/ -C "my@email.com"

After creating the SSH key open Git Bash and create a ~/.bashrc file with the following content:

SSH_ENV=$HOME/.ssh/environment
 
# start the ssh-agent
function start_agent {
    echo "Initializing new SSH agent..."
    # spawn ssh-agent
    /usr/bin/ssh-agent | sed 's/^echo/#echo/' > "${SSH_ENV}"
    echo succeeded
    chmod 600 "${SSH_ENV}"
    . "${SSH_ENV}" > /dev/null
    /usr/bin/ssh-add
}
 
if [ -f "${SSH_ENV}" ]; then
     . "${SSH_ENV}" > /dev/null
     ps -ef | grep ${SSH_AGENT_PID} | grep ssh-agent$ > /dev/null || {
        start_agent;
    }
else
    start_agent;
fi


Next you can add print & copy the content of SSH key file

cat ~/.ssh/

and paste it to BitBucket or GitHub web UI for your account or your team. Also note this Bitbucket article for further help on multiple accounts / SSH keys.

For multiple BitBucket  accounts we need to create a ~/.ssh/config file with smth like that (note the indent, it's required):

Host personal
 User me
 Hostname bitbucket.org
 PreferredAuthentications publickey
 IdentitiesOnly yes
 IdentityFile ~/.ssh/id_personal
Host work
 User work_user
 Hostname bitbucket.org
 PreferredAuthentications publickey
 IdentitiesOnly yes
 IdentityFile ~/.ssh/id_work

and your Git commands should address these new hosts instead of deafult 'bitbucket.org' or 'github.org':

git clone git@personal:myteam/repo.git

An aletrnative to the Git clone command above could be a Git fetch (the 2-nd answer here) as listed below:

git init
git remote add origin git@personal:myteam/repo.git
git fetch origin
git checkout -b master --track origin/master

Next I had to switch off my VBox Aerospike VM and add "Port Forwarding" (VBox ->select VM -> Settings -> Network -> select your current NW adaptor -> Advanced), forwarding my machine' port 3000 to the VM' port 3000 so I can access the DB from the code by pointing to "127.0.0.1" localhost.


Other suggestions how to access a remote service on a VirtualBox VM actually did not work for me, so ended up with teh Ports Forwarding for now. It's good to start the VM again and manually run Aerospike:

sudo service aerospike start

Now wait for a few seconds and try in the  XTerm in your VM the following:

telnet localhost 3000

if everything is OK you should connect to your local Aerospike DB. Next, open "cmd.exe" on your host machine (install Microsoft telnet utility for your Windows if you did not do it yet) and run:

telnet localhost 3000

on your Windows machine. Assuming your port forwarding was properly defined you should be now connected to Aerospike on your VirtualBox VM.

Now it's time to get back to IntelliJ, but first take a break and read "Java client best practices" before moving on with coding with Aerospike. The first try with Java Aerospike client looks this way

import com.aerospike.client.*;
import com.aerospike.client.policy.BatchPolicy;
import com.aerospike.client.policy.ClientPolicy;
import com.aerospike.client.policy.WritePolicy;

public class MyAerospikeTest {

    public static void main( String[] argv){
        Host[] hosts = new Host[] {
                new Host("127.0.0.1", 3000),
//                new Host("another.host", 3000),//                new Host("and.another.host", 3000)        };

        AerospikeClient client = new AerospikeClient( new ClientPolicy(), hosts);
        // write a new value following the example: http://www.aerospike.com/docs/client/java/usage/kvs/write.html
        // Initialize writePolicy.        WritePolicy writePolicy = new WritePolicy();
        writePolicy.timeout = 5;  // 5 millisecond timeout.
        // Write multiple values.        Key key = new Key( "test", "myset", "mykey");
        Bin bin1 = new Bin( "name", "John");
        Bin bin2 = new Bin( "age", 25);
        client.put( writePolicy, key, bin1, bin2);

        System.out.println( "Added a new record to Aerospike DB!");

        // Now let's see what we wrote there        BatchPolicy batchPolicy = new BatchPolicy();
        batchPolicy.timeout = 2; // 2 ms timeout on read        // Get the record        Record whatWeWrote = client.get( batchPolicy, key);
        System.out.println( "Got the record from DB");
        // get some bins from the record (note to get just two bins "name" and "age" we could use: Record record = client.get(policy, key, "name", "age"); )        System.out.println( "Name: " + whatWeWrote.bins.get("name") + ", Age: " + whatWeWrote.bins.get("age"));

        // delete the record        client.delete( writePolicy, key);
        System.out.println( "And now removed the record from DB");

        client.close();

        System.out.println( "Closed connection and exited. See you soon");
    }
}


and when it runs it produces the expected output:

Added a new record to Aerospike DB!
Got the record from DB
Name: John, Age: 25
And now removed the record from DB
Closed connection and exited. See you soon

Process finished with exit code 0


So far so good. Moving forward, I was quite surprised reading about configuration challenges associated with the Aerospike namespaces. Storage receipts added even more confusion: what storage configuration should be requested in my use cases and how I am supposed to know that? I definitely do not want to get into some namespace limit, neither in terms of defined space not for the access time / latency once the data set grows up. Meanwhile I left it for the future research - I still need to move on with putting all things to work together.

The good surprise was Secondary Indexes and the query language, including aql tool. Clustering and monitoring for Community Edition also look promising. And Java docs are very comprehensive.

And here is yet another surpirse: it appears that IntelliJ (including the Community Edition) can convert any Java file to Scala with "Add framework support - >Scala" switched on for a Project / Module (Refactor menu / CTRL+SHIFT + G). Meaning, you can take open-source Aerospike client and rebuild it in Scala, and then contrubute a Scala plugin back to Aerospike. Or you can write Java code around Aerospike Java library and convert only your code to Scala with IntelliJ. And of course you can simply write your Scala code down and call Aerospike Java client from there as well.

In IntelliJ, in order to let module A in a project to be aware of packages / classes of module B we to add "A on B dependency". For Maven project / modules it is easy - add smth like

<dependency>
    <groupId>my-group-id</groupId>
    <artifactId>my-artifact-id</artifactId>
    <version>1.0</version>
</dependency>

to "A" pom.xml file, where the above IDs are like they are specified for your module "B".

Aeropsike namespaces can only be added by adding the namespace definition to
 /etc/aerospike/aerospike.conf
file. For the possible configuration parameters please refer to http://www.aerospike.com/docs/reference/configuration/.  After the new namespace is configured restart the Aerospike server.
(also note this post to avoid issues when adding namespaces. In general, namespaces can be RAM (with or without HHD for persistence) and SSD / Flash.

In the same way, the only option to delete a namespace in Aerospike is stopping the service, deleting the namespace from the configuration file, removing the associated file and then restarting the server.

Quite a lot of what compared to DELETE DATABASE AAA
MySQL SQL statement.

I found this nice Scala (wrapper) library for Aerospike: https://github.com/Tapad/scaerospike
and the blog post Aerospike on scaling:
http://engineering.tapad.com/blog/2014/08/aerospike-at-tapad-how-we-scale/

More about scaling up: http://www.slideshare.net/AerospikeDB/linked-in-twitter-facebook-google-email-embed-configuring-aerospike-part-2
Slide 7: in the clustered environment adding / removing a namespace requires cluster-wide restart
Slide 8: keep nodes identical to run at full cluster' capacity
Slide 9, 24: like mentioned by Tapad guys in the above post high-watermark and default TTL look to be the most important namespace configuration parameters. TTL / Expiration logic explained at Slide 25. NOte that if a record is updated the TTL is restarted.
Slide 11: A single record always belong to a single node
Slide 28: At high watermark server drops items with closest TTL.
Slide 29: Aerospike can stop writing new records if "stop-writes" is reached.


For now I got everything up and running with Java and Aerospike' handy Java API. I still have to look into Tapad' open source Scala Aerospike client.

Tuesday, September 15, 2015

Allowing secondary monitor for VirtualBox (5.0.4) VM in three easy steps

1. Power off VM. Go to Settings->Display, change number of monitors to 2. Add video memory if there is a warning.
2. Run the VM. Open View->Virtual screen 2 menu and select "Enabled". The second VM window appears.
3. As per your VM OS go to Settings / Control Panel and modify Display so the OS can use both monitors, just like with the normal Windows or Linux computer. For Ubuntu it is Settings->Display, for Windows you can right-click on desktop background and select "Screen Resolution..." menu.

Installing Ubuntu 14.04 in VirtualBox for NGiNX modules development

For teh first time, after many years with RHEL / FEdora / CentOS family I decded to give a try to Ubuntu. Why? First, because it is the Linux of choice at AWS, after Amazon Linux of course.
Second, in order to learn something different. Third, in order to make some comparison by myself.

First surprise with Ubuntu 14.04.03 which I installed with Oracle VirtualBox (I gave this development VM 4 CPUs, 12 GB RAM, 40GB HD) is that there is no root access. I defined a user during the install and this user got 'sudo' permissions. So either I have to write 'sudo' every time or allow root access. The latest is not recommended, and this explains why the root access is by default disabled at Ubuntu. In general, I agree with the idea that there is no need to run any user process as a root, and for any system I develop I actually define a specific user which such a system uses. So let's see if I can manage it without enabling root account.

After installing a basic server configuration I wanted to add a Desktop so I could add development IDE there. The only thing I needed to run was:
sudo apt-get install ubuntu-desktop
(as per this link) followed by reboot did the job. Next, I added VBox Guest Additions and got a full-screen resizable Desktop. After that I started to look how I can open a terminal window :). This was a real challenge since "Search" for 'xterm' using top-left Ubuntu icon only gave me the reference documentation for that. It did not run the terminal process though.
CTR-ALT-T worked, but I could not find any other app as well, even not a web browser.

Since I do dnot save the snapshot for teh basic server install I decided to give up and re-installed Ubuntu 14.04 server. Once the basic server install was completed I ran
sudo apt-get --install-recommends install ubuntu-desktop
It took about 15 minutes on my i7 Windows 8.1 machine to install all the required packages, and than I got a black screen with no text. As per System Monitor the VirtualBox process was keep writing things on disk and kept using CPU. First time it happened I killed the process after 10 minutes or so and started over. Next time it happened again, so I decided to give it a chance and left it open.
At the end I found out that I just had to press ENTER and the text is now shown again!
sudo reboot now.
I started VirtualBox Guest Additions CDROM, than Rebooted the machine (had to repeat it twice until it worked) and got teh working Desktop environment.

All-in-all, about 4h to get there with trial and errors.

Next, I installet NetBeans 8.1beta for C++/Java/Scala development. It requested to install JDK (8u60). I also had to install GNU C++ compiler:
sudo apt-get install g++
and CMake
sudo apt-get install cmake
I also had to install PCRE, zlib and a few more librbaries on Ubuntu in order to properly build quite a minimal configuration of NGiNX from the sources:
sudo apt-get install libpcre3 libpcre3-dev zlib1g-dev build-essential libssl-dev

Now I configured NGiNX from the source to be installed in a development path:
cd ; ./configure --prefix=/home/david/dev/nginx
It created Makefile in that folder. I started NetBeans with "New C/C++ project from existing source", pointed to that  and got the Netbeans project for NGiNX.

I had to modify Netbeans project (Right-click on project -> Properties)
adding
${MAKE} -f Makefile install 
instead of 
${MAKE} -f Makefile
to Build section,
and adding 
./configure --prefix=/home/david/dev/nginx
to Pre-build section (check "Pre-build" checkbox!)
After all, I got an IDE-compiled running NGiNX.


Thursday, June 04, 2015

Installing s3cmd from the sources

1. Go to s3cmd GitHub home page: https://github.com/s3tools/s3cmd

2.  Install python, wget and unzip if not installed
yum install unzip python-pip wget

3. Download the archive with the sources:
wget https://github.com/s3tools/s3cmd/archive/master.zip

4. unzip, change directory and run install:

unzip master.zip

cd s3cmd-master

python setup.py install

 5. Run s3cmd and save configuration in the config file:
s3cmd --configure

(provide your access and secret keys on the prompt)

Sunday, May 10, 2015

Create a new Git repository for new / existing project in Netbeans while putting it on Bitbucket

First, there are free accounts at Bitbucket.org, up to 10 users, no obligations, private repositories.

Create a Bitbucket account. Login. Go to "Repositories" menu at the top screen bar and select "Create repository". Add the repository name and other info and create the repository. When done, copy & paste the URL which now appears in the browser, e.g. "https://bitbucket.org/david_mail/my_new_repository".

Open your Netbeans project (I am currently using NB 8.0.2), right click on the project name, select "Versioning"->"Initialize Git Repository". Next, right-click again on the project name and select "Git"->"Commit".

Your project is no in th elocal repository. Let's connect it to teh remote repository so they'll auto-merge. At top NB menu open "Team"->"Remote"->"Push".
If it is the first time you add this Git repository put the Bitbucket' repository URL in "Specify Git Repository Location / origin"->"Repository URL" and provide your user credentials for Bitbucket. Hit "Next" and "Finish" buttons and you are done.

Saturday, April 18, 2015

Installing VirtualBox Guest Additions 4.3.26 on CentOS 7 minimal install

#login as root or "su" there

mkdir /media/cdrom
mount /dev/cdrom /media/cdrom

# will be mounted as read-only, no worries

cd /media/cdrom
./VBoxLinuxAdditions.run

# it will skip all X installs since there is no X in minimal edition